Getting started with Git using GitHub Desktop
Overview
Teaching: 25 min
Exercises: 0 minQuestions
What are repositories and how are they created?
What do
addandcommitmean?How do I check the status of my repository?
Objectives
create a Git repository
track changes to files using the Git repository
query the current status of the Git repository
Setting up GitHub Desktop
When we use GitHub Desktop on a new computer for the first time, we need to configure a few things. The first step is to log into Github Desktop so it can access information and repositories tied to our account.
To do so, log into GitHub on your browser, then open Github Desktop and click “Sign into Github.com”. This should open a new tab in your browser asking you to authorize GitHub Desktop.
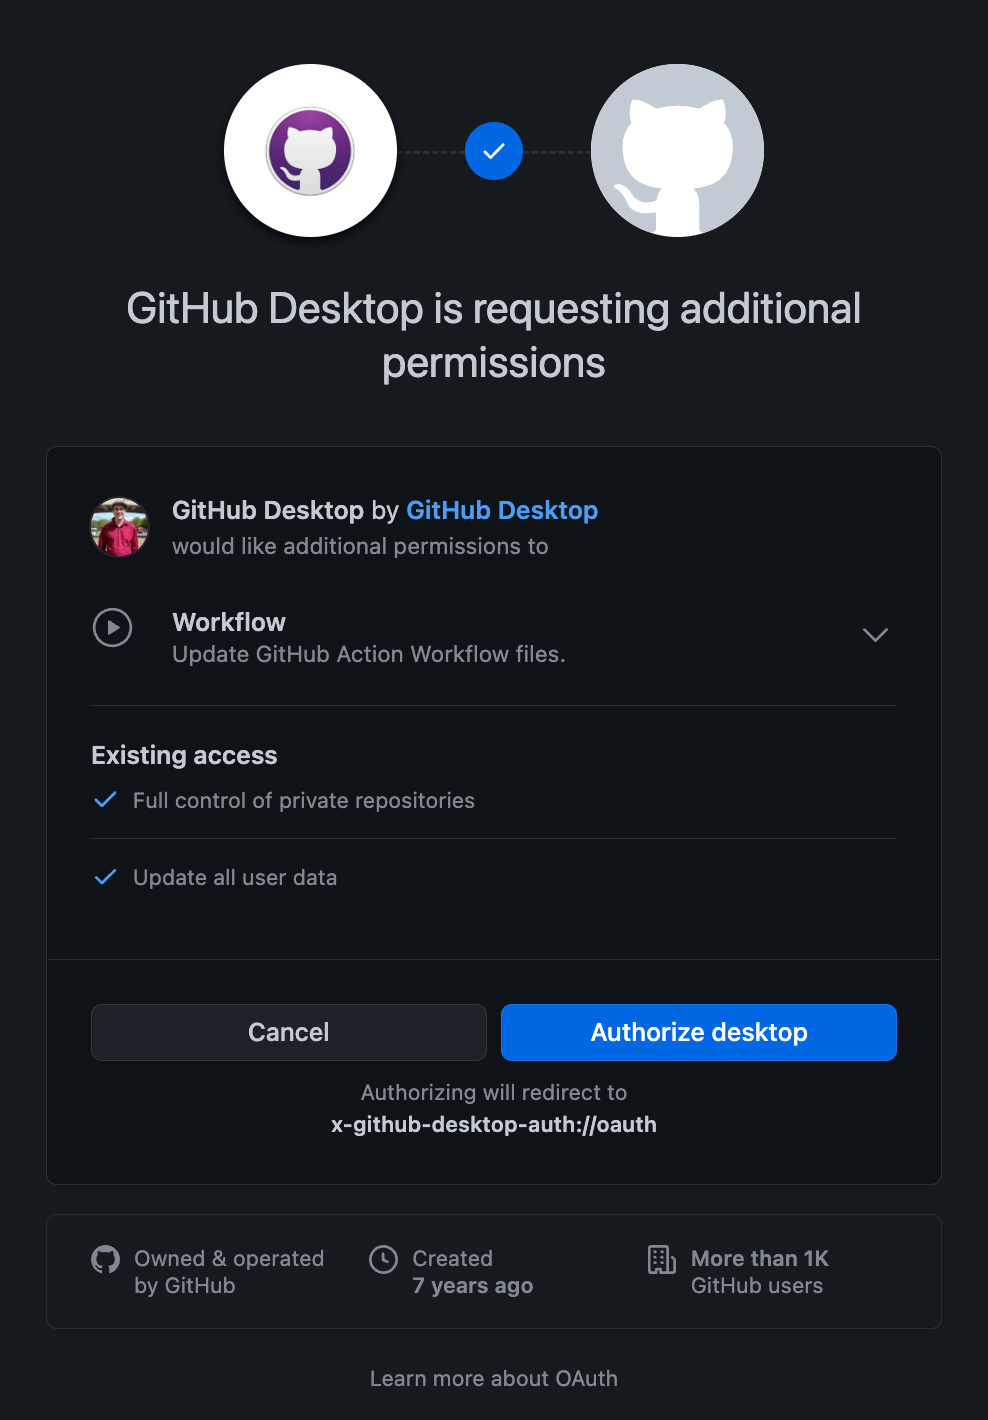
Once you click authorize, you will need to reenter your GitHub password then choose whether to use the name and email on your GitHub account (recommended) or change them.
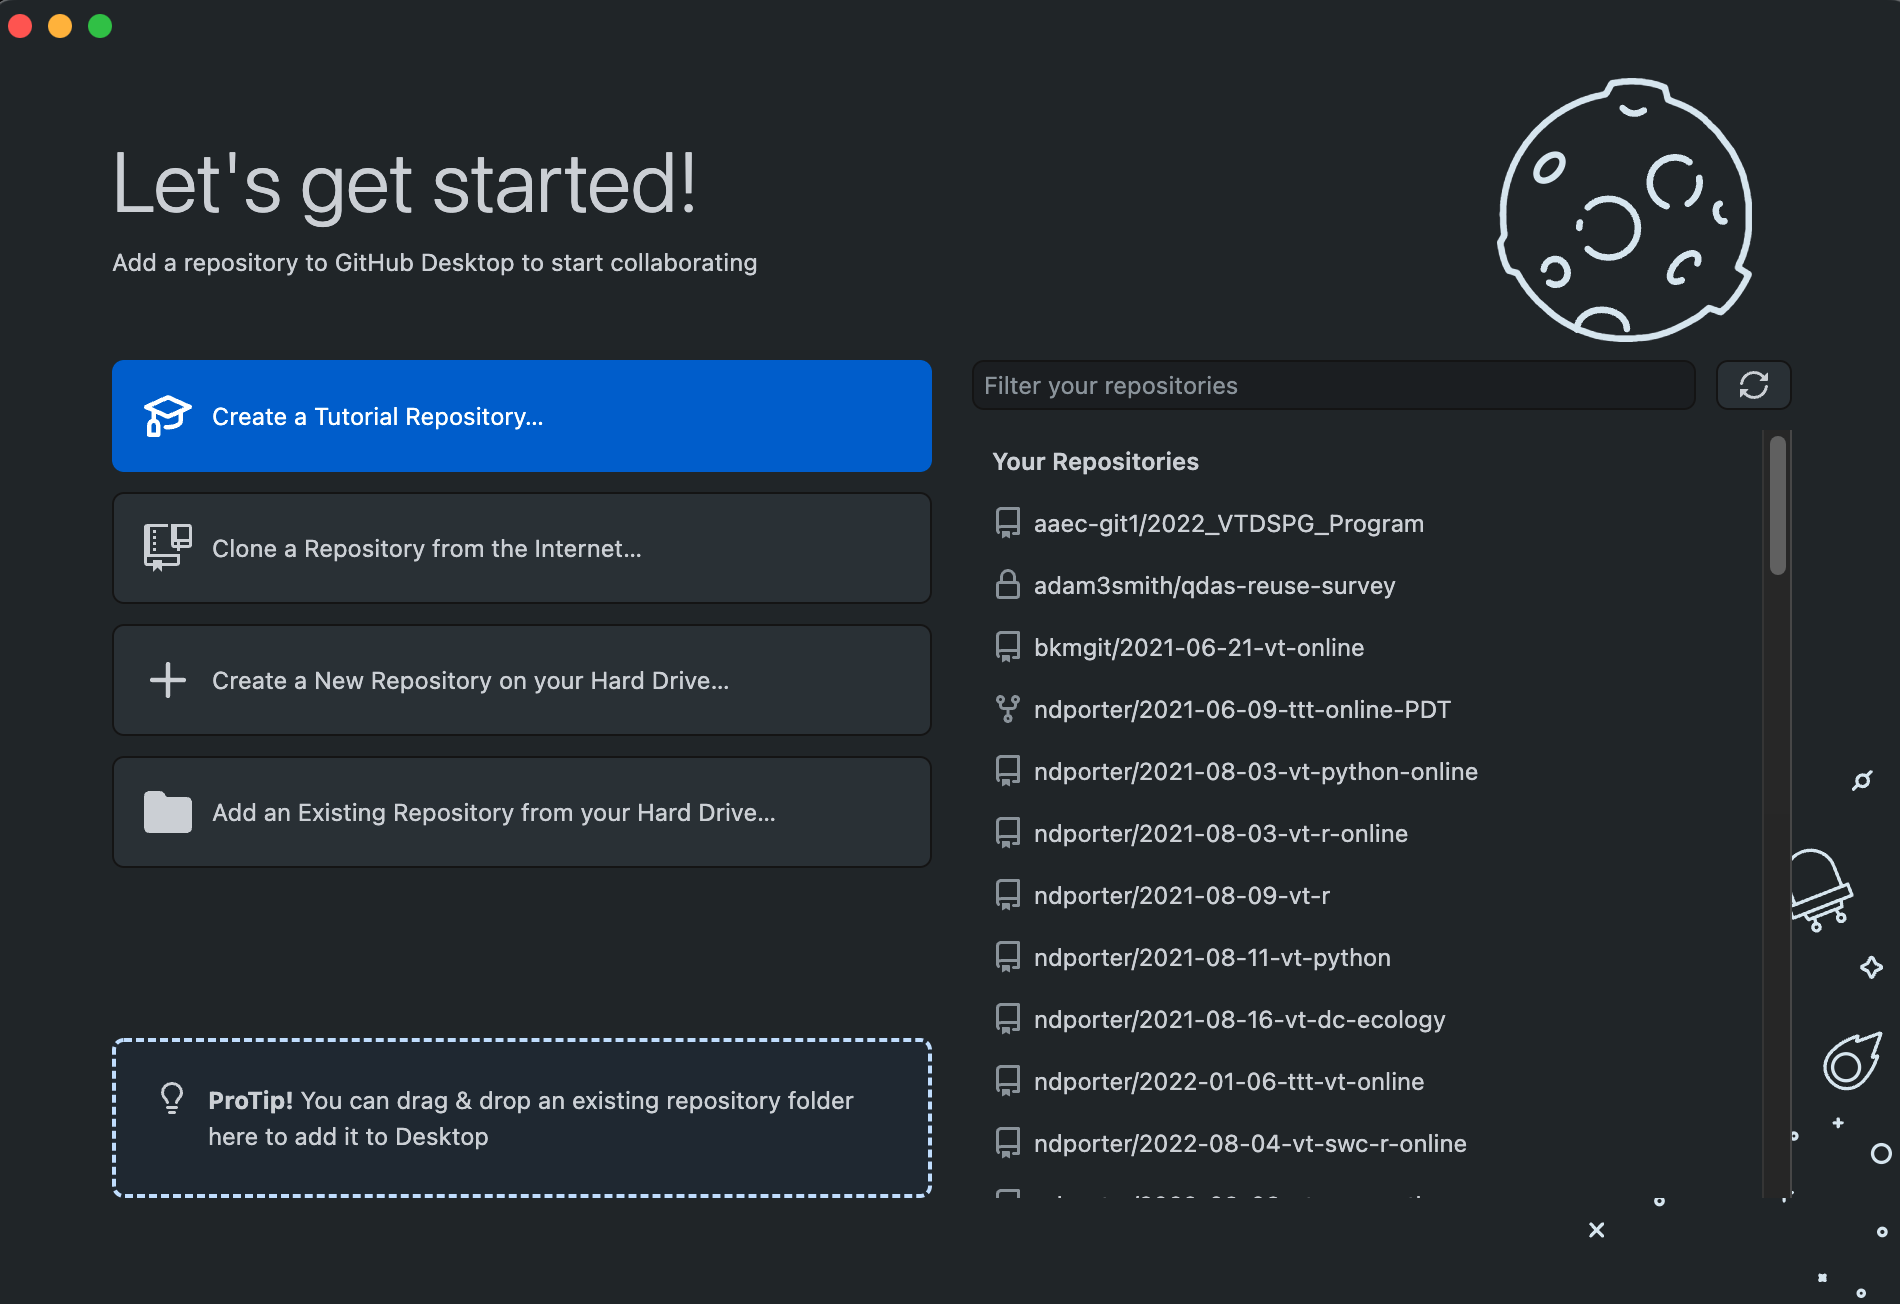
After this, you should see a start screen that resembles the image below. If you haven’t used Github before, you won’t see any repositories, but we’ll fix that soon enough.
Options and Preferences
Optionally, before going on, take a minute to browse some of the general settings for GitHub Desktop (
GitHib Desktop - Preferenceson Mac;File - Optionson Windows). TheAccountsscreen should show your logged-in GitHub account. Your name and email should be correct (and generally match your GitHub account) inGitandmainshould be selected as the default branch name.masterused to be the default for most Git repositories but was replaced due to association with slavery.Appearancealso allows you to choose light or dark themes. ClickSaveif you changed anything and close out of the options window before continuing.
Creating a repository
A Git repository is a data structure used to track changes to a set of project files over time. Repositories are
stored within the same directory as these project files, in a hidden directory called .git. We can create a new git
repository either by using GitHub’s web interface or in GitHub Desktop.
Let’s use the the app to create a git repository for the experiments that we’re going to do today. Start by clicking the Create a New Repository on your Hard Drive button.
The name we give to the repository will be created as a new directory within the directory chosen as Local Path. In general, try to give repositories short descriptive names using only letters, numbers, dashes, and underscores. For now, name your repository hello-world, leave the other options unchanged, and click Create Repository.
Using Git
One of the main barriers to getting started with Git is understanding the terminology necessary to execute commands. Although some of the language used in Git aligns with common-use words in English, other terms are not so clear. The best way to learn Git terminology - which consists of a number of verbs such as add, commit and push - is to use it, which is what we will be doing during this lesson. We will explain these commands as we proceed from setting up a new version-controlled project to publishing our own website.
On a command line interface, Git commands are written as git verb options,
where verb is what we actually want to do and options is additional optional information which may be needed for the verb. So let’s get started with our setup.
While we won’t use the command line today, there will be notes here in case you end up using it later, so you can connect what we’re doing to standard Git terminology.
The Create Repository button first creates a new directory for our project, then initializes an empty git repository to track changes to our project.
On the command line, this corresponds to the mkdir (make directory) and git init (initialize) commands.
$ mkdir hello-world
$ cd hello-world
$ git init
Initialized empty Git repository in <your file path>/hello-world/.git/
The hello-world directory is now a git repository.
In GitHub Desktop, you should see something like the screen below. We’ll learn more about the elements of the interface and repository soon, but the below discussion provides a quick overview of what you see in the interface.
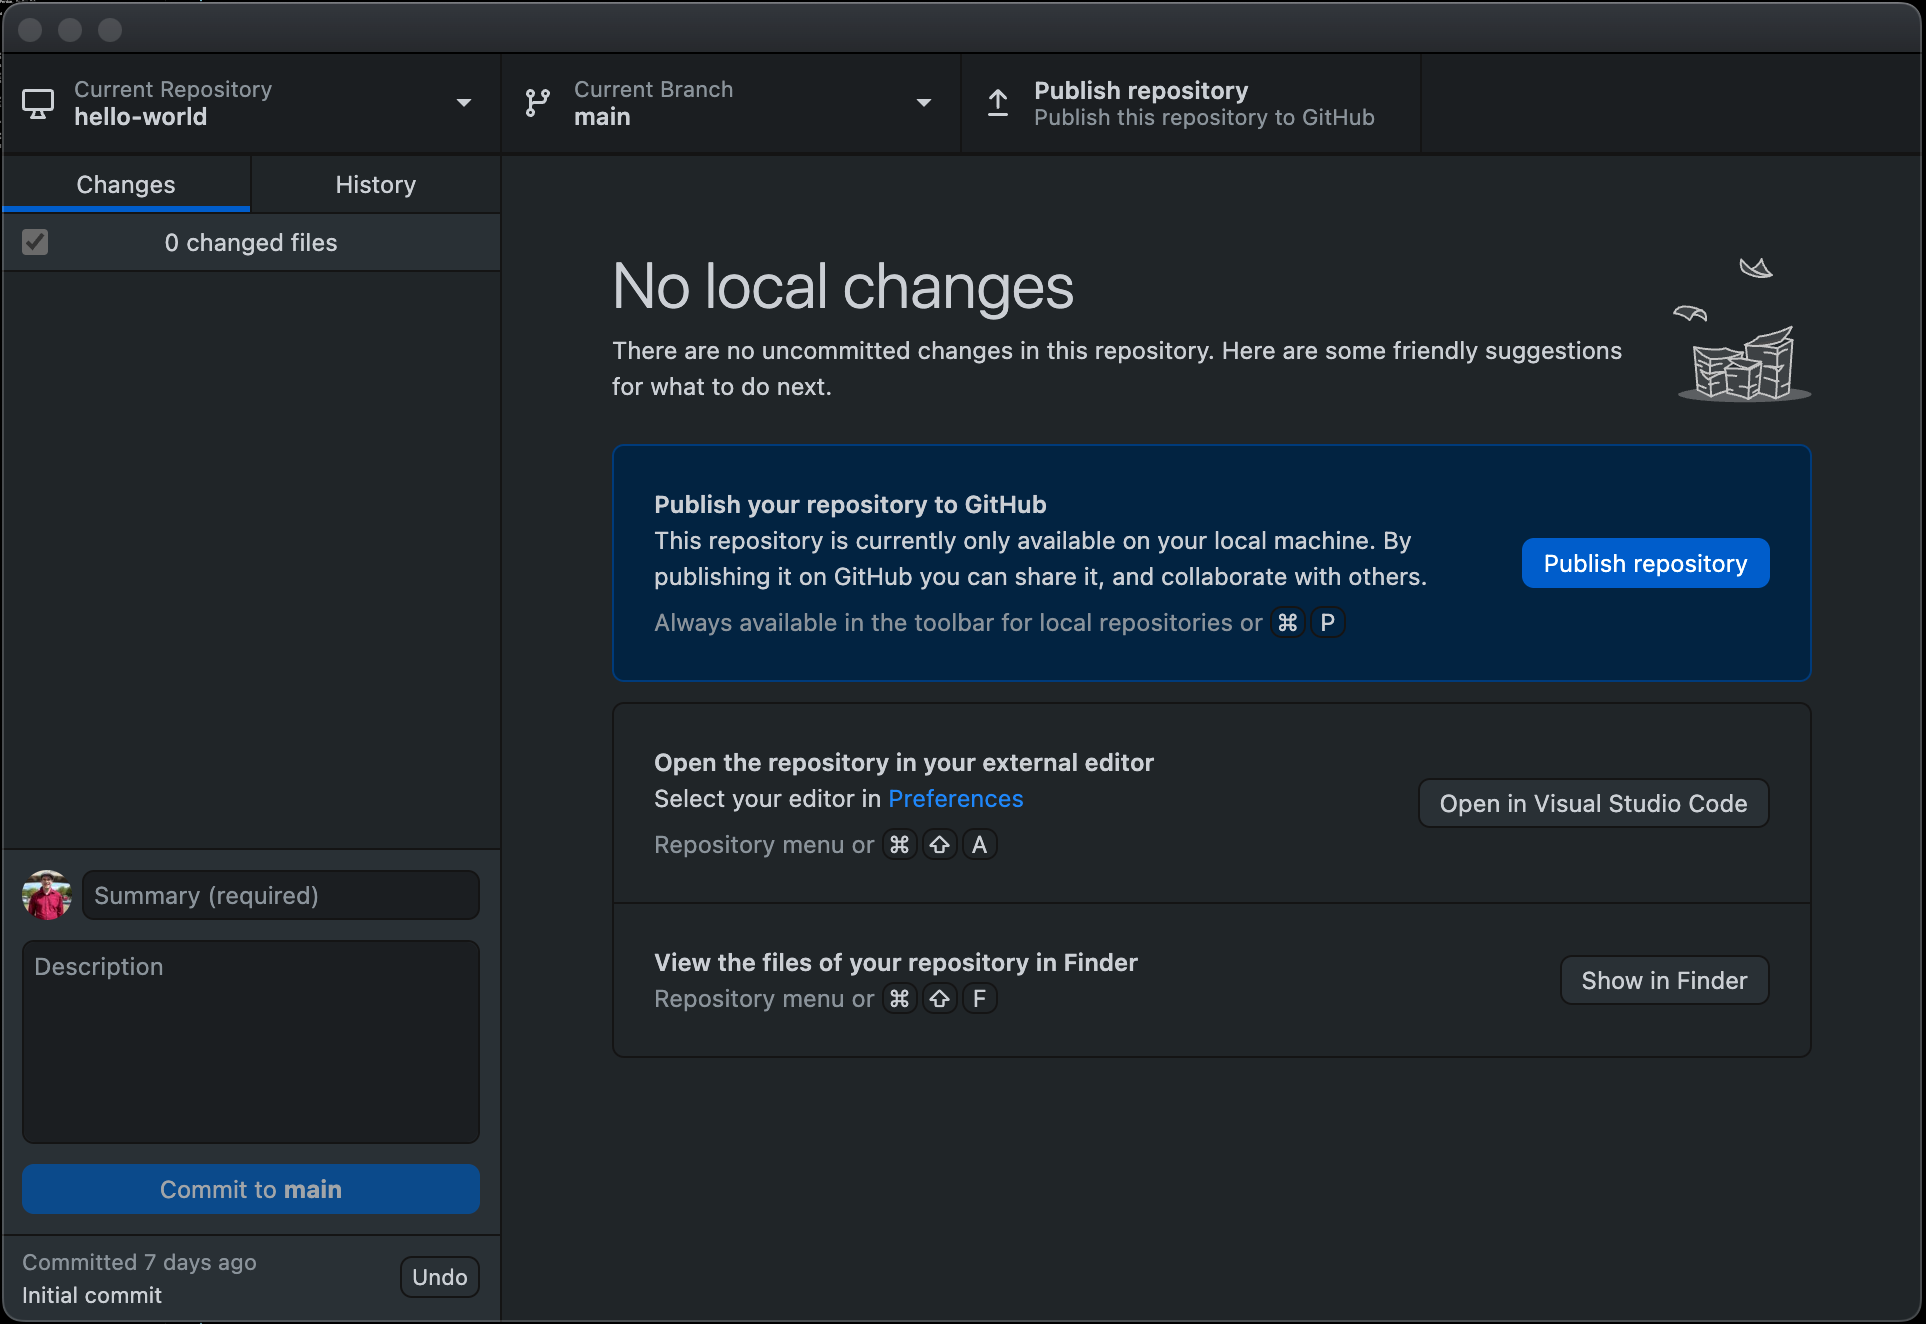
At the top, you can see that we are in the hello-world repository and on the main (default) branch.
On the left, you should see a Changes tab showing no changes, because we haven’t done anything beyond create the repository yet.
As we add or change files, they’ll appear here, and the options in the bottom left will help us track those changes when we’re ready.
Since we aren’t actively viewing a file, the main (right) area in the window provides some information and suggestions on what we might want to do next.
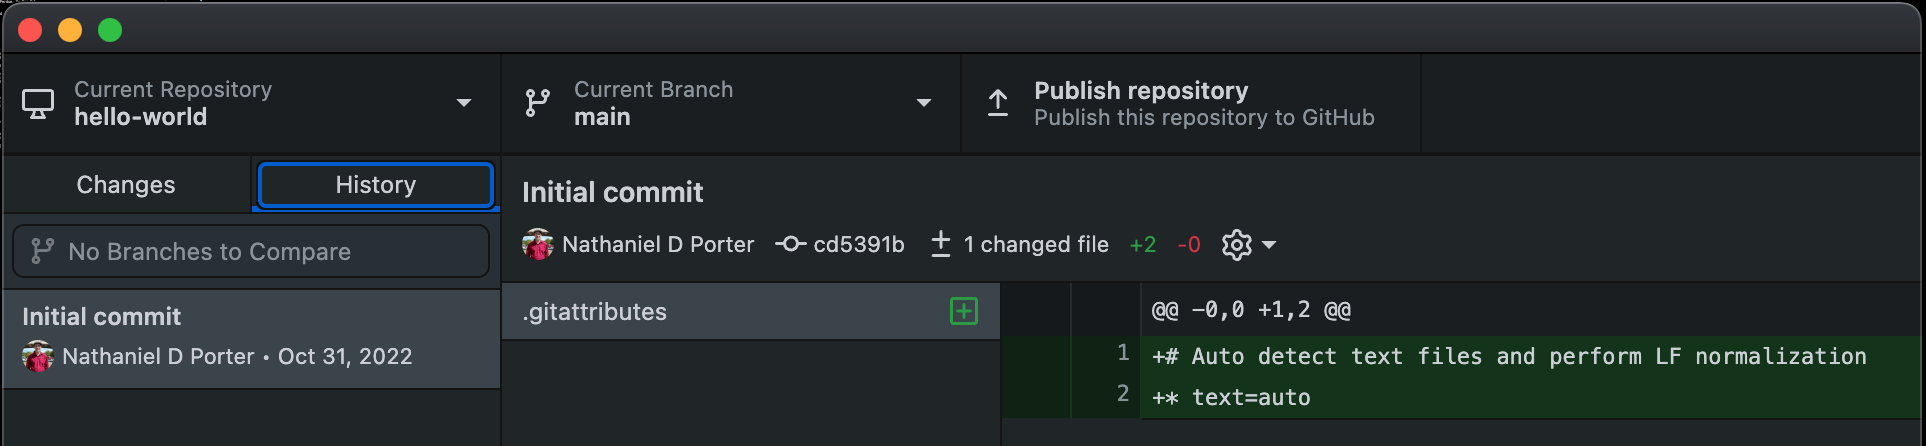
Clicking the History tab on the left allows us to view a list of changes over time in our repository (see below). We have only made a single commit (or update) to our repository, when we initialized it, which shows up on the left with a commit message (“initial commit”), user, and date. Each file that was changed, added, or deleted in that commit is visible in the middle column (here, just .gitattributes), and clicking on one shows each row that was changed, added, or deleted in that file during that commit.
If we click back on the Changes tab and choose Show in Finder or Show in Explorer, the repository might seem empty; however, GitHub Desktop has created a hidden .git directory and a hidden .gitattributes file. In general, files that start with a . are hidden because they are not meant to be edited by most users. Hidden files will still be included in the repository when we upload to GitHub, and can be viewed on the local computer by changing options.
Two steps: Adding and committing
We will now create and save our first project file. This is a two-step process. First, we add any files for which we want to save the changes to a staging area, then we commit those changes to the repository. This two-stage process gives us fine-grained control over what should and should not be included in a particular commit.
Let’s create a new readme.md file to document basic information about our project that will also display on the repository homepage on GitHub. Open a text editor (like Notepad in Windows or TextEdit on Mac) and create a new file with the following text:
# Hello World!

This repository is practice for Library Carpentry.
The .md extension above signifies that we have chosen to use the Markdown format, a lightweight markup language with plain text formatting syntax. The
hash character is one way of writing a header with Markdown. We will explore Markdown a bit later.
Save the file in your project directory with the name readme.md. If you’re using TextEdit on Mac, you may have to save it with the wrong format (Rich Text Document is fine for now) and then open the directory in finder, rename it to remove the RTF and confirm that you want to change it to an .md file.
If you’re going to be doing a lot of text file creation or editing, it’s worth taking the time to set up a more powerful text editor, like Visual Studio Code which can interact directly with GitHub Desktop and can automatically show your repository files.
For now, let’s check the status of our project again. Without doing anything in GitHub Desktop after creating the file, here’s what mine now looks like:
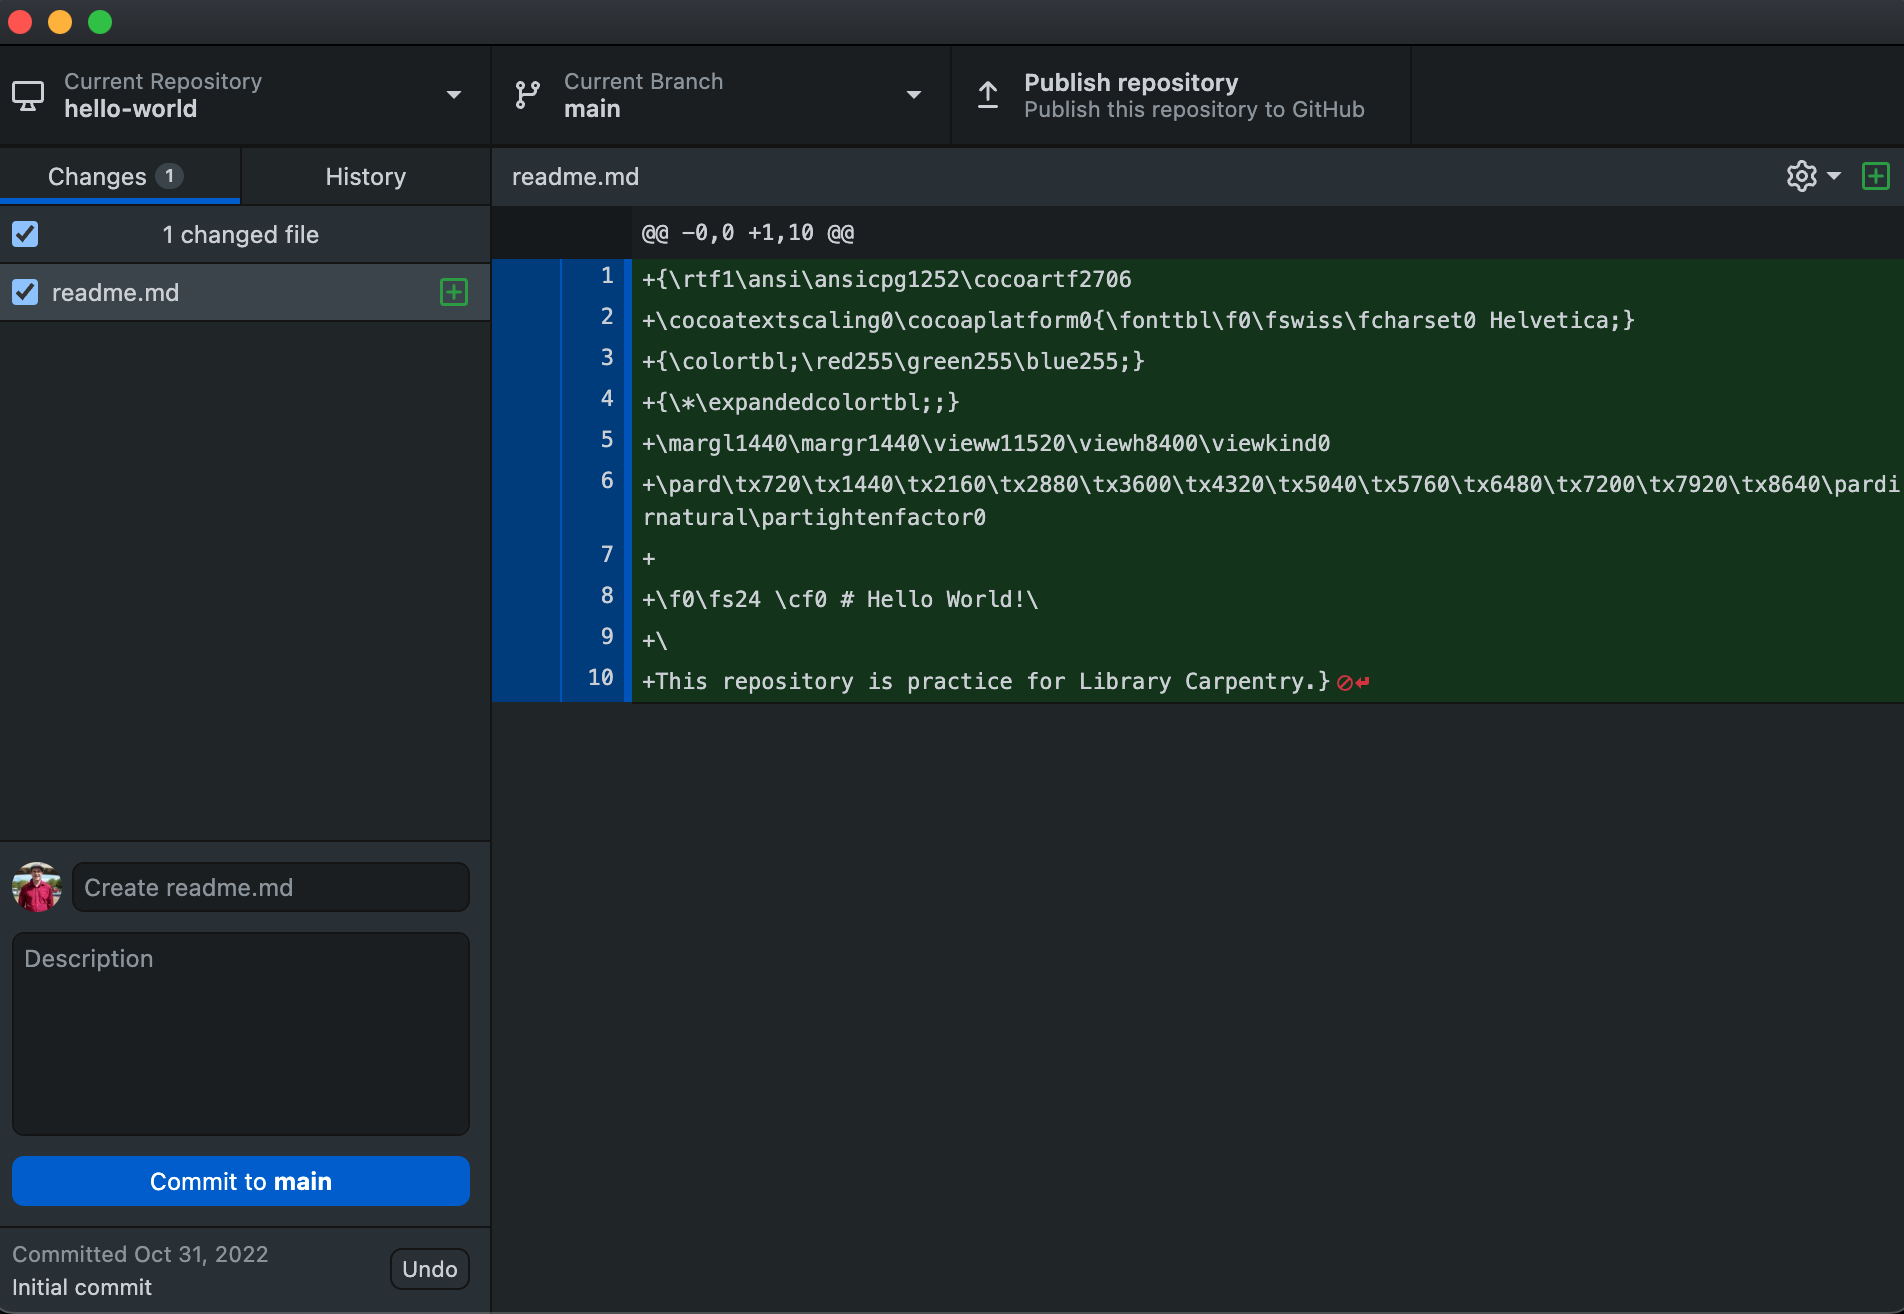
First we see the status on the left showing “1 changed file” and listing the file.
This status is telling us that Git has noticed a new file in our directory.
By default, GitHub Desktop has assumed we want to track this file and performed the Add action.
Files with changes added will have a check mark to their left in this list.
If you were using Git from the command line, you would use git add like this:
$ git add readme.md
This adds our Markdown file to the staging area (the area where git checks for file changes).
On the right, we see some odd-looking lines of text.
This are shows changes in the highlighted file on the left, called the diff (differences) in command line terminology.
Each line that starts with a + was added since the last commit; lines with a - at the start were removed.
If a line was changed, the old version will display a - and the new version a +.
Since we just created this file, all lines start with a +.
You’ll probably also notice in the image here that there are ten lines even though we only created three!
I created the file in TextEdit on my Mac and had to save it as a .rtf file before changing the format.
As a result, there are extra lines at the start with information from the other format.
Common document editors like Microsoft Word add even more artifacts to files, which is one reason programmers prefer to work in text editors.
Now we are ready to commit our first changes. Commit is similar to ‘saving’ a file to Git. However, compared to saving, a commit provides a lot more information about the changes we have made, and this information will remain visible to us later.
Before you commit the changes, write a brief commit message, a short, descriptive, and specific summary of what we did to help us remember later on without having to look at the actual changes. GitHub Desktop will suggest a message which, in this case (“Create readme.md”) is probably enough and can be left. You can also add a longer description if you wish.
When ready to commit, click the Commit to main button.
Notice that, once again, the main window says “No local changes”.
This is because the changes we did make have been tracked (by adding) and recorded (with the commit) and are no longer “staged”.
Insteaad, we now have a permanent record of what was changed, and git has also recorded some additional metadata: who made the commit (you!) and when the commit was made (timestamp). You are building a mini-history of your process of working with the files in this directory.
More on the Staging Area
If you think of Git as taking snapshots of changes over the life of a project,
addspecifies what will go in a snapshot (putting things in the staging area), andcommitthen actually takes the snapshot, and makes a permanent record of it. Github Desktop differs from Git in that it automatically adds every change, unless you specifically remove it by unchecking it in the list, which is kind of like gathering everyone for the picture! However, it’s almost always better to explicitly add things to the staging area, because you might commit changes you forgot you made. (Going back to snapshots, you might get the extra with incomplete makeup walking on the stage for the snapshot because you didn’t check each file) It’s also typically best to keep commits small and closely related, so changes are easy to find later, particularly if they break another part of the project. Before executing acommit, double check both the files and the changes within them, and uncheck any files you’re not ready tocommitor you might find yourself searching for “git undo commit” more than you would like!

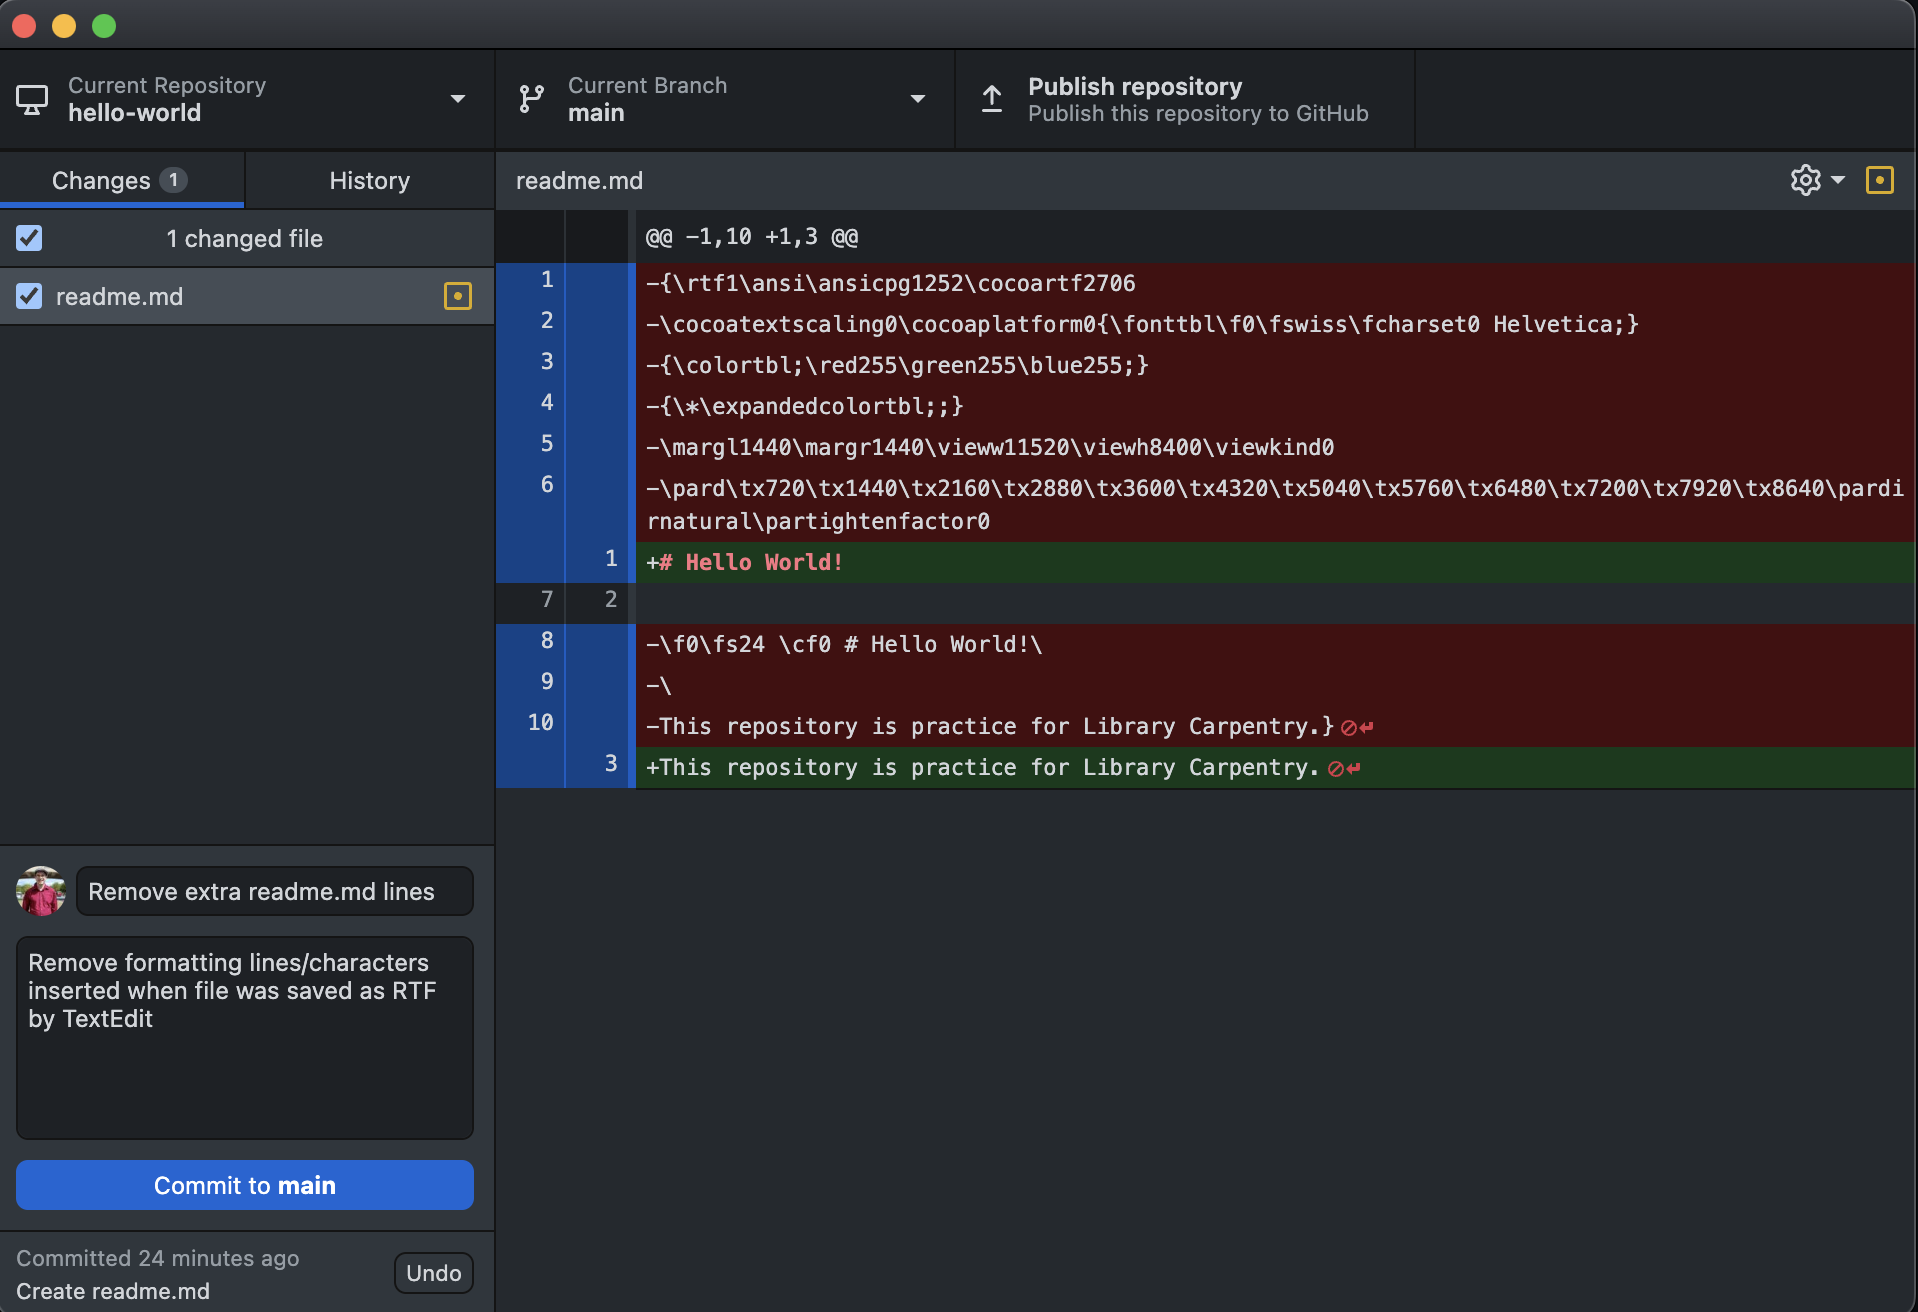
If your readme.md file ended up with lots of random characters, now is a good time to find or download a different text editor,
remove everything but the 3 lines of text we intended to add, save the file, and make another commit with the changes.
A good commit message might be Remove extra readme.md lines with more detail in the optional description as below
(note how the lines in the main window use +/- and coloring to indicate changes):
At the moment, our changes are only recorded locally, on our computer. If we wanted to work collaboratively with someone else they would have no way of seeing what we’ve done. We will fix that in the next episode by using GitHub to share our work.
Key Points
When you initialize a Git repository in a directory, Git starts tracking the changes you make inside that directory.
This tracking creates a history of the way the files have changed over time.
Git uses a two-step process to record changes to your files. Changes to files must first be added to the staging area, then committed to the Git repository.